Programming guide
Because Idefix is designed to run on hybrid architecture, there are some subtilities which are not found in other classical CPU-only codes. These subtilities are described in this section, along with some basic coding rules which can be handful.
Data types
Because Idefix can run on GPUs, and since GPUs experience a significant speedup when working
with single precision arithmetic, a specific real datatype is used for all floating point
operations in Idefix. This is by default aliased to double in idefix.hpp, but it can easily be modified
to float for specific problems. Note however that this loss of precision might have a strong
impact on the quality of the solution and is therefore not recommended.
Host and device
Idefix relies on the Kokkos framework, and therefore assumes that system it’s running is made of two sub-systems: a host and a device. The host is traditionnaly the CPU, and is taking care of inputs and outputs, initialisation and allocation, MPI data exchanges. The device is usually an accelerator (e.g. a GPU) and is actually performing the computation (or most of it).
Note that while Idefix assumes there is a host and a device, they can be the same processing unit (think of the code running only on your laptop CPU). In this case, Kokkos performs several optimisations, so that everything effectively runs on the host smoothly.
By construction, the host doesn’t have direct access to the device memory and vice-versa. This means that accessing an array on the device from the host will inevitably lead to a segmentation fault. This is a very common mistake, so keep this in mind when coding in Idefix.
Arrays
The fact that most of the computations are performed on the device implies that specific
allocations on the device need to be performed. To make things easier on the programmer’s side, array allocations
should always use one of the IdefixArraynD where n is between 1 and 4. These arrays are
an alias for Kokkos::View which are fine-tuned for idefix, and are templated by the datatype,
which for most applications should be real.
By definition, an IdefixArray is always allocated on the device, and is therefore not accessible
from the host. To define an array on the host, one use instead IdefixHostArraynD.
Note that IdefixHostArraynD can be defined as mirrors of an IdefixArraynD, to simplify data
transfer.
It should be noted that these
arrays are not just a contiguous memory zone as one would expect from a C array. Instead, they
are C++ objects, with several properties. In particular, pointer arithmetic, which is a common
(bad) practice on C arrays, is not allowed on IdefixArray. Allocation is performed as an instantiation
of the IdefixArraynD class with the array name and size in parameter. For instance, the following code block will allocate
myOldArray and perform a shallow copy of myOldArray.
int arraySizeX1 = 10;  // 1st dimension of the arrays
int arraySizeX2 = 10;  // 2nd dimension of the arrays
// allocation
IdefixArray2D<real> myOldrArray("ArrayName", arraySizeX1, arraySizeX2);
// Shallow copy of myOldArray to myNewArray
IdefixArray2D<real> myNewArray = myOldArray;
No data is copied,
myNewArray is merely a new reference to the same memory block on the device. Similarly,
accessing an element of an IdefixArraynD should always be done with the accessor (...). In
the example above, one should use for instance myNewArray(1,2) (note the round brackets).
It is possible to copy data to/from the host/device manually using Kokkos::deep_copy (see examples
in DataBlockHost::syncToDevice()). However, Idefix provides higher level functions
which should be sufficient for most uses through the classes DataBlockHost and GridHost.
Tip
IdefixArray internally contains a reference counter, so that when the array is not referenced
anymore, the memory is automatically freed. Hence there is no equivalent of C free for
IdefixArray.
Execution space and loops
Just like with arrays, code can be executed on the host or on the device. Unless otherwise mentionned, code
is by default executed on the host. Since the device is supposed to be performing the computation itself
and because it is usually coded using loops, Idefix provides a special way to handle
loops which are to be executed on the device, with the function idefix_for.
idefix_for is just a way to write a for loop, with some caveats. Depending on the kind of device
Idefix is running, the loop can be unrolled in an arbitrary order, and some iterations might
be executed simultaneously. So care should be taken when writting loops.
A typical loop on three indices looks like
// Allocate an Idefix Array
IdefixArray3D<real> myArray("MyArray", nx1, nx2, nx3);

idefix_for("LoopName",
           kbeg,kend,
           jbeg,jend,
           ibeg,ieng,
           KOKKOS_LAMBDA (int k, int j, int i) {
              myArray(k,j,i) = 0.0;
            });
This loop will be executed on the device, and will perform a loop on indices i,j,k ranging from
ibeg to iend for i, etc. Note that as expected, we access the data stored in an IdefixArray
inside an idefix_for, i.e. code which is executed on the device.
The string "LoopName" should be descriptive of the loop (i.e. avoid “loop1”, “loop2”…).
It is used when profiling or debugging the code and it names the execution kernels.
Note finally that the last argument of idefix_for relies on the KOKKOS_LAMBDA construct,
which implies that Idefix is actually making a C++ lambda when a loop is called.
While this should be transparent to most users, It should be kept in mind that these lambdas
capture their variables by value [=]. To avoid too much overhead, one should therefore avoid capturing
complex structures. Moreover, a bug in the Nvidia Cuda compiler nvcc prevents Cuda lambdas
from capturing class members (see this post). While
this bug is tightly linked to the C++14 norm and will be addressed in C++17, one should always
make local copies of the class members before using them in loops, to keep compatibility with Cuda
in C++14.
Warning
As stated above, to avoid compatibility issues with nvcc, always make local copies (references)
of the arrays and variables you intend to use before calling idefix_loop. This ensures that
these variables will be properly captured by device lambdas. It is the most common reason for
GPU specific segmentation faults.
Warning
Generally, methods that contain calls to idefix_loop() should always be declared as
public. This is due to a limitation of the nvcc compiler which cannot perform
lambda captures from private methods.
Reductions
The idefix_for allows one to perform loops on arrays stored on the target. However, reductions
(that is, for instance, summing on all of the elements, or finding a maximum) are not possible
with idefix_for. When a reduction is needed, one should instead use idefix_reduce.
The syntax of idefix_reduce is very similar to that of idefix_for, with the addition of the
variable over which the reduction is performed, and the type of reduction which is expected.
For instance, a sum over all of the elements would be done through:
// Allocate an Idefix Array
IdefixArray3D<real> myArray("MyArray", nx1, nx2, nx3);
// Initialize the array somehow
...

real mySum = 0.;   // Note that the result will be stored on the host!
idefix_reduce("Sum",
              kbeg,kend,
              jbeg,jend,
              ibeg,ieng,
              KOKKOS_LAMBDA (int k, int j, int i, real &localSum) {
                  localSum += myArray(k,j,i);
              },
              Kokkos::Sum<real> (mySum));
In the above example, localSum is the temporary variable on the device over which portions of the reduction
are performed, while mySum is the final variable, on the host where the result is stored.
It is possible to do other reduction operations like findining minimum, maximum etc (see Kokkos custom reductions for a list). For instance, the minimum value is obtained with the following code snippet:
// Allocate an Idefix Array
IdefixArray3D<real> myArray("MyArray", nx1, nx2, nx3);
// Initialize the array somehow
...

real myMin = 0.;   // Note that the result will be stored on the host!
idefix_reduce("Minimum",
              kbeg,kend,
              jbeg,jend,
              ibeg,ieng,
              KOKKOS_LAMBDA (int k, int j, int i, real &localMin) {
                  localMin = std::fmin(localMin, myArray(k,j,i));
              },
              Kokkos::Min<real>(myMin));
Note that when running on GPU architectures, reductions are particularly inefficient operations. If possible, it is therefore recommended to avoid them as much as possible, or to group them.
Grid
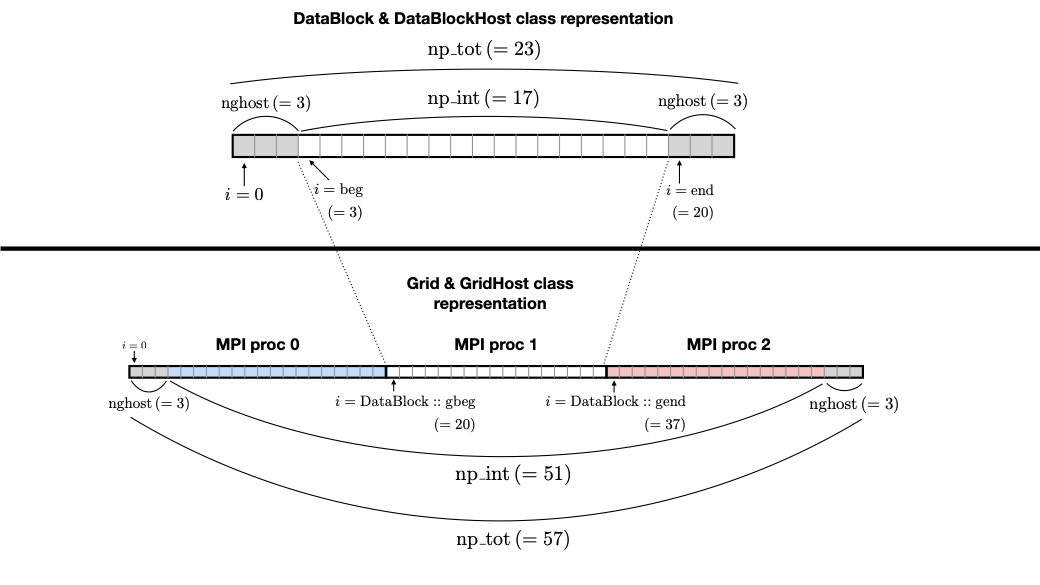
Idefix uses a grid which is automatically built during startup using the informations provided in the input file (see Grid section). While programming your own physical problem, it can be useful to have access to the informations about the grid, such as the grid coordinates, cell volume, etc. Because Idefix uses MPI domain decomposition, the grid is accessible in two classes. The full grid (i.e the full physical problem, omitting any domain decomposition) is stored in the Grid class, while the local MPI subdomain that belongs to each processor is stored in the DataBlock class class.
The indices which are defined and used throughout the code in each of these classes are presented in the scheme below (the numbers in parenthesis are the value of each variable in this particular example).
Useful classes
The Input class
Input is a class which holds all of the information regarding command line and input file data.
It provides accessors such as
// Accessor to input parameters
// the arguments are always: BlockName, EntryName, ParameterNumber (starting from 0)

// Read a parameter of type T from the input file and throw an error if it cannot be found
// T can be a std::string, a number (real, int, double, float, int64_t) or a boolean
template<typename T>
T Get(std::string blockName, std::string paramName, int num);

// Read a parameter of type T from the input file. Set it to default if it cannot be found.
// T can be a std::string or a number (real, int, double, float, int64_t) or a boolean
template<typename T>
T GetOrSet(std::string blockName, std::string paramName, int num, T default);


// Check that a block/entry is present
int CheckEntry(std::string, std::string);
Note that Input doesn’t really read the input file each time an accessor is called. Internally,
Input reads everything when constructed in a C++ container with all the data coming from the command line and the input file.
Hence there is no read overhead when one calls one of these accessor.
For instance, considering a .ini file:
[MyBlock]
myentry   1.0    0.0
It is possible to fetch the entry myentry using the Input accessors. Assuming an
instance of Input is allocated in myInput:
real firstParameter = myInput.Get<real>("MyBlock","myentry",0)  // firstParameter=1.0
real secondParameter = myInput.Get<real>("MyBlock","myentry",1)  // secondParameter=0.0
real thirdParameter = myInput.GetOrSet<real>("MyBlock","myentry",2, 0.0) // thirdParameter default to 0.0
If a parameter is not found, Get<T> will log an error and exit. One can use the CheckEntry
method to check if a parameter is set in the ini file before trying to access it, or use GetOrSet<T>
with a default value, as in the example above.
Tip
Command line options are also parsed by the Input class. These options are stored in a
specific block named CommandLine.
Grid class
Grid is essentially a datastructure which represents the full computational domain (i.e. without domain decomposition,
if MPI has been enabled). Here is the full API for this class (one may refer to Grid for a graphical representation of the grid ):
-
class Grid
The Grid class is designed to store the grid data of the FULL computational domain on the Host (i.e. of all of the MPI processes running). The domain decomposition is performed by the child instances of the DataBlock class, which are built on a Grid instance, using the cartesian MPI communicator of that Grid. Note that all of the arrays of a Grid are on the device. If a Host access is needed, it is recommended to use a GridHost instance from this Grid, and sync it.
Public Members
-
std::vector<IdefixArray1D<real>> x
geometrical central points
-
std::vector<IdefixArray1D<real>> xr
cell right interface
-
std::vector<IdefixArray1D<real>> xl
cell left interface
-
std::vector<IdefixArray1D<real>> dx
cell width
-
std::vector<real> xbeg
Beginning of grid.
-
std::vector<real> xend
End of grid.
-
std::vector<int> np_tot
total number of grid points (including ghosts)
-
std::vector<int> np_int
internal number of grid points (excluding ghosts)
-
std::vector<int> nghost
number of ghost cells
-
std::vector<BoundaryType> lbound
Boundary condition to the left.
-
std::vector<BoundaryType> rbound
Boundary condition to the right.
-
bool haveAxis = {false}
Do we require a special treatment of the axis in spherical coords?
-
GridCoarsening haveGridCoarsening = {GridCoarsening::disabled}
Is grid coarsening enabled?
-
std::vector<bool> coarseningDirection
whether a coarsening is used in each direction
-
std::vector<int> nproc
/< Total number of procs in each direction
-
std::vector<int> xproc
/< Coordinates of current proc in the array of procs
-
std::vector<IdefixArray1D<real>> x
DataBlock class
DataBlock contains all of the data structures that belong to that particular process (i.e. if MPI is enabled, it contains data
specific to this subprocess, in contrast to Grid). Here is the full API for the dataBlock class (one may refer to Grid for a graphical representation of the grid ):
-
class DataBlock
Public Functions
-
void MakeGeometry()
Compute geometrical terms.
Compute the geometrical terms for the grid. This function computes all of the geometrical terms (cell volumes, faces surfaces, trigonometric functions)
-
void DumpToFile(std::string)
Dump current datablock to a file for inspection.
-
int CheckNan()
Return the number of cells which have Nans.
-
void EvolveStage()
Evolve this DataBlock by dt.
-
void SetBoundaries()
Enforce boundary conditions to this datablock.
-
void Coarsen()
Coarsen this datablock and its objects.
-
void ShowConfig()
Show the datablock’s configuration.
-
real ComputeTimestep()
compute maximum timestep from current state of affairs
-
void ResetStage()
Reset the variables needed at each major integration Stage.
-
void EnrollGridCoarseningLevels(GridCoarseningFunc)
Enroll a user function to compute coarsening levels.
-
void CheckCoarseningLevels()
Check that coarsening levels satisfy requirements.
Public Members
-
std::vector<IdefixArray1D<real>> x
geometrical central points
-
std::vector<IdefixArray1D<real>> xr
cell right interface
-
std::vector<IdefixArray1D<real>> xl
cell left interface
-
std::vector<IdefixArray1D<real>> dx
cell width
-
std::vector<IdefixArray1D<real>> xgc
cell geometrical cell center
-
IdefixArray1D<real> rt
In spherical coordinates, gives $\tilde{r}$.
-
IdefixArray1D<real> sinx2m
In spherical coordinates, gives sin(th) at a j-1/2 interface
-
IdefixArray1D<real> tanx2m
In spherical coordinates, gives tan(th) at a j-1/2 interface
-
IdefixArray1D<real> sinx2
In spherical coordinates, gives sin(th) at the cell center.
-
IdefixArray1D<real> tanx2
In spherical coordinates, gives tan(th) at the cell center.
-
IdefixArray1D<real> dmu
In spherical coordinates, gives the $\theta$ volume = fabs(cos(th_m) - cos(th_p))
-
std::vector<IdefixArray2D<int>> coarseningLevel
Grid coarsening levels (only defined when coarsening is enabled)
-
std::vector<bool> coarseningDirection
whether a coarsening is used in each direction
-
std::vector<real> xbeg
Beginning of active domain in datablock.
-
std::vector<real> xend
End of active domain in datablock.
-
IdefixArray3D<real> dV
cell volume
-
std::vector<IdefixArray3D<real>> A
cell right interface area
-
std::vector<int> np_tot
total number of grid points in datablock
-
std::vector<int> np_int
active number of grid points in datablock (excl. ghost cells)
-
std::vector<int> nghost
number of ghost cells at each boundary
-
std::vector<BoundaryType> lbound
Boundary condition to the left.
-
std::vector<BoundaryType> rbound
Boundary condition to the right.
-
bool haveAxis = {false}
has been required for these.
DataBlock contains points on the axis and a special treatment
-
GridCoarsening haveGridCoarsening = {GridCoarsening::disabled}
Is grid coarsening enabled?
-
GridCoarseningFunc gridCoarseningFunc = {NULL}
The user-defined grid coarsening level computation function.
-
std::vector<int> beg
First local index of the active domain.
-
std::vector<int> end
Last local index of the active domain+1.
-
std::vector<int> gbeg
First global index of the active domain of this datablock.
-
std::vector<int> gend
Last global index of the active domain of this datablock.
-
real dt
Current timestep.
-
real t
Current time.
-
Grid *mygrid
Parent grid object.
-
std::map<std::string, StateContainer> states
conservative state of the datablock (contains references to dedicated objects)
-
bool rklCycle = {false}
// Set to true when we’re inside a RKL call
-
void MakeGeometry()
Hydro class
The Hydro class (and its sub-classes) contains all of the fields and methods specific to (magneto) hydrodynamics. While
interested users may want to read in details the implementation of this class, we provide below a list of the most important
members
IdefixArray4D<real> Vc;      // Main cell-centered primitive variables index
IdefixArray4D<real> Vs;      // Main face-centered varariables
IdefixArray4D<real> Uc;      // Main cell-centered conservative variables

// Enroll user-defined boundary conditions
void EnrollUserDefBoundary(UserDefBoundaryFunc);

// Enroll user-defined ohmic, ambipolar and Hall diffusivities
void EnrollOhmicDiffusivity(DiffusivityFunc);
void EnrollAmbipolarDiffusivity(DiffusivityFunc);
void EnrollHallDiffusivity(DiffusivityFunc);

// Enroll user-defined isothermal sound speed
void EnrollIsoSoundSpeed(IsoSoundSpeedFunc);
The first two IdefixArrays are the ones storing the primitive variable fields. These arrays
are 4D, the first dimension being the field number. Idefix defines aliases for these numbers,
so that one can call Vc(VX1,k,j,i) in place of Vc(1,k,j,i) to get the first velocity component.
These aliases are defined in idefix.hpp
Because the code uses contrained transport, the field defined on cell faces is stored in the Vs
array. Just like for Vc, there are aliases, with “s” suffixes defined to simplify the adressing
of the magnetic field components, as Vs(BX2s,k,j,i).
DataBlockHost class
This class is a mirror class, which is designed to be a (partial) copy of the DataBlock class,
but in which all of the arrays are stored on the host. Obviously, DataBlockHost comes handy
when one has to deal with input/outputs, debugging and initialisation.
The DataBlockHost should always be constructed with a DataBlock in argument. This ensures
that the DataBlockHost knows where its parent DataBlock is located. When created, a DataBlockHost
fills the following arrays (essentially grid information) with data from its parent DataBlock:
IdefixArray1D<real>::HostMirror x[3];   // geometrical central points
IdefixArray1D<real>::HostMirror xr[3];  // cell right interface
IdefixArray1D<real>::HostMirror xl[3];  // cell left interface
IdefixArray1D<real>::HostMirror dx[3];  // cell width

IdefixArray3D<real>::HostMirror dV;     // cell volume
IdefixArray3D<real>::HostMirror A[3];   // cell right interface area
Note however that the physics arrays are not automatically synchronized when DataBlockHost is
created, that is:
IdefixArray4D<real>::HostMirror Vc;     // Main cell-centered primitive variables index
IdefixArray4D<real>::HostMirror Vs;     // Main face-centered primitive variables index
IdefixArray4D<real>::HostMirror J;      // Current (only when haveCurrent is enabled)
IdefixArray4D<real>::HostMirror Uc;     // Main cell-centered conservative variables
IdefixArray3D<real>::HostMirror InvDt;

IdefixArray3D<real>::HostMirror Ex1;    // x1 electric field
IdefixArray3D<real>::HostMirror Ex2;    // x2 electric field
IdefixArray3D<real>::HostMirror Ex3;    // x3 electric field
need to be synchronized manually. These IdefixArrays are all defined as HostMirror, implying that they are accessible
from the host only. If modifications are performed on the arrays of the
parent DataBlock, one can call DataBlockHost::SyncFromDevice() to refresh the host arrays,
and inversely one can call DataBlockHost::SyncToDevice() to send data from DataBlockHost
to the parent DataBlock.
Finally, DataBlockHost provides a useful method DataBlockHost::MakeVsFromAmag(IdefixHostArray4D<real> &)
which can be used to initialise the face-centered magnetic field stored in DataBlockHost::Vs from a user-defined
magnetic potential. See Setup::InitFlow method.
DumpImage class
This class loads a restart dump in host memory and makes it available to the user. It is particularly
useful when one wants to initialise the flow from a previous simulation using a different
resolution/dimension/physics, as in such cases, Idefix is unable to automatically restart with the
simple -restart command line option.
The DumpImage class definition is
class DumpImage {
public:
  DumpImage(std::string, Output &);   // constructor with dump filename and output object as parameters

  int np_int[3];               // number of points in each direction
  int geometry;                // geometry of the dump
  real time;                   // time at which the dump was created
  IdefixArray1D<real> x[3];    // geometrical central points
  IdefixArray1D<real> xr[3];   // cell right interface
  IdefixArray1D<real> xl[3];   // cell left interface

  std::map<std::string,IdefixHostArray3D<real>> arrays;  // 3D arrays stored in the dump
};
Typically, a DumpImage object is constructed invoking the DumpImage(filename, output) constructor,
which essentially opens, allocate and load the dump file in memory (when running with MPI, each processor
have access to the full domain covered by the dump, so try to avoid loading very large dumps!).
The user can then have access to the dump content using the variable members of the object
(eg DumpImage::arrays['variable'](k,j,i)). Do not forget to delete the object once you have
finished working with it. An example is provided in Initialising from a restart dump.
Warning
DumpImage should not be used to restart idefix in the same run
(use the -restart option in Command line options for this)
Note
Note that the naming conven in DumpImage::arrays combine the original array and variable name.
It is generically written XX-YYY where XX is the array name in the dataBlock (e.g.
Vc or Vs) and YYY is the variable name (e.g. VX2 or BX3s).
LookupTable class
The LookupTable class allows one to read and interpolate elements from a coma-separated value (CSV) file or a numpy file
(generated from numpy.save in python).
CSV constructor
LookupTable can be initialised with any CSV file with a 1D or 2D lookup table which content has the following shape:
x1 |
x2 |
x3 |
data1 |
data2 |
data3 |
x1 |
x2 |
x3 |
|
y1 |
data1,1 |
data2,1 |
data3,1 |
y2 |
data1,2 |
data2,2 |
data3,2 |
Each element of the CSV file can be separated by an arbitrarily chosen delimiter (which can be “,” “;”, etc…). Such a file can be loaded using the constructor
template <int nDim>
LookupTable<nDim>::LookupTable(std::string filename, char delimiter);   // Load a CSV file
Note that the number of dimensions the lookup table should expect is given as a template parameter nDim to the class LookupTable.
For the CSV constructor, nDim can only have the values 1 or 2.
Note
The input CSV file is allowed to contain comments, starting with “#”. Any character following
“#” is ignored by the LookupTable class.
Numpy constructor
An instance of LookupTable can also be initialised from numpy arrays with an arbitrary number of dimensions nDim. In this case,
the constructor expects a vector of size nDim of .npy files for the 1D coordinates of the lookup table, and a single file containing the
nDim dimensions of the lookup table. The constructor is defined as
template <int nDim>
LookupTable<nDim>::LookupTable(std::vector<std::string> coordinates, std::string dataSet);
Note that the template parameter nDim should match the number of dimensions of the numpy array stored in the file dataSet.
Using the lookup table
Once an instance of LookupTable has been created from a CSV or a Numpy file, it can be used using the Get method inside an idefix_for loop (i.e. from the device), or with
the GetHost method when calling outside of a idefix_for (i.e. from the host).
The Get and GetHost functions expect a C array of size nDim and returns the multi-linear interpolation from the lookup table. For instance:
#include "lookupTable.hpp"

// Load a 2D CSV lookup table
LookupTable<2> csv("example2D.csv",',');

// Use the lookup table in an idefix_for loop (Device)
idefix_for("loop",0, 10, KOKKOS_LAMBDA (int i) {
  real x[2];
  x[0] = 2.1;
  x[1] = 3.5;
  arr(i) = csv.Get(x);
});

// Use the lookup table outside of an idefix_loop (Host)
real y[2];
y[0] = 3.0]
y[1] = -1.0;
real result = csv.GetHost(y);
Note
Usage examples are provided in test/utils/lookupTable.
Debugging and profiling
The easiest way to trigger debugging in Idefix is to switch on Idefix_DEBUG in cmake (for instance
adding -DIdefix_DEBUG=ON when calling cmake). This forces the code to log each time a function is called or
returned (this is achieved thanks to the idfx::pushRegion(std::string) and idfx::popRegion() which are
found at the beginning and end of each function). In addition, Idefix_DEBUG enables Kokkos array bound checks, which
will throw an error each time one tries to access an array out of its allocated memory space. Note that all of these
debugging features induce a large overhead, and should therefore not be activated in production runs.
It is also possible to use Kokkos-tools to debug and profile the code.
For instance, on the fly profiling, can be enabled with the Kokkos space-time-stack module. To use it, simply clone
Kokkos-tools to the directory of your choice (say $KOKKOS_TOOLS), then cd to
$KOKKOS_TOOLS/profiling/space-time-stack and compile the module with make.
Once the profiling module is compiled, you can use it by setting the environement variable KOKKOS_PROFILE_LIBRARY.
For instance, in bash:
export KOKKOS_PROFILE_LIBRARY=$KOKKOS_TOOLS/profiling/space-time-stack/kp_space_time_stack.so
Once this environement variable is set, Idefix automatically logs profiling informations when it ends (recompilation of Idefix is not needed).
Tip
By default, Kokkos-tools assumes the user code is using MPI. If one wants to perform profiling in serial, one should disable MPI before
compling the space-time-stack module. This is done by editing the makefile in $KOKKOS_TOOLS/profiling/space-time-stack
changing the compiler CXX to a valid serial compiler, and adding -DUSE_MPI=0 to CFLAGS.
Minimal skeleton
Because it is sometimes useful to do experiments with a very simple code without the burden of the full initialisation,
experiment with Idefix basic structures (idefix_for, idefix arrays, idefix objects)
can be done using a minimal skeleton, located in $IDEFIX_DIR/test/skeleton. The file main.cpp can be filled with any experimental
code and replaced Idefix standard main file. It should then be configured using cmake like any other Idefix problem cmake $IDEFIX_DIR
and compiled with make. In the example provided, the skeleton performs a simple sum on an idefix array and compares it
to the same reduction on the host.